 |
| My TRS-80 Model 4P: You can't really see it but that's CP/M running off of the FreHD that you also can't really se on top of the machine. |
CP/M Emulation
So in my last post, I mentioned that I was kind of itching to do some software project, but due to my current situation, I was really looking for something emulated, not a physical machine. My TRS-80 Model 4P immediately popped in my head, of course, but my last time I really had problems with emulators. This was mostly because they wanted me to supply the ROM, but I still didn't have a way to exchange data between my 4P and my Mac. Well, after some Internet digging (I swear I am the worst googler in the history of humanity), I finally found a working Model 4P ROM. (Yes, I downloaded the ROM, even though it's copyrighted. All I can offer is that you trust that I really do own the machine, as evidenced by the photo above.)
So with the 4P ROM in hand, digitally speaking, I tried out the TRS32 emulator first. Although I'm a Mac person, I do have Windows running both in VMWare and in Boot Camp, so being a Windows-only program isn't necessarily a deal breaker. And to be honest, it's a good program. I had a few minor complaints with the interface, but overall it was very functional and easy to setup. The only real issue I had is that it's shareware, costing $69 to register, and hard drive support was only included in the full version - something I knew I would want, since my 4P had FreHD. Also, the guy does TRSTools for free, which is a nice little program to read/write TRS-80 floppy disk images. I'm not opposed to paying for software, and his gift of TRSTools to the community made me even more interested in throwing him some cash, but $70 for an emulator seemed steep to me.
Then I found SDLTRS, an open source cross-platform emulator based on xtrs, an X-Windows emulator. It is open source, and seems to do everything the full version of TRS32 does, including hard drive support. The Windows and Linux interfaces are a bit spartan, but the Mac interface is pretty nice, though I wish the Mac supported the same keyboard shortcuts the Windows version does and was a little less mouse-driven. In any case, it was as easy to get up and running as TRS32 was, and seemed every bit as functional. So it became an easy choice, and so far I haven't regretted picking SDLTRS over TRS32.
Getting CP/M Running
 As you might guess, this was basically just grabbing a disk image, popping it into the virtual floppy drive in SDLTRS, and booting up the VM. But which CP/M? There are several for the 4P, the two most common being CP/M Plus and Montezuma Micro's CP/M. CP/M Plus was limited to CP/M 3.0, and since I already knew I was going with CP/M 2.2, that left only Montezuma's CP/M. Here's where I got my CP/M image, and in fact most of the CP/M software that I downloaded.
Now before you hop out to that site and start downloading everything like I did, you may want to pause a bit to avoid some mistakes I made. First, you don't need every CP/M boot disk that's out there. I just got the last of the Montezuma Micro CP/M boot disks, and that's what I used. Second, disks will be labeled as either of type COM, DSK, or DMK. COM means that it's actually going to come as a binary program, not a disk image, so you'll need to copy it to a disk image to run it. There are two ways to do this, which I'll discuss below. DSK and DMK are two virtual disk image formats, so either of these are potentially usable in SDLTRS. However, while SDLTRS does support DMK, I noticed that a lot of them were larger than the 166k floppy drives that the emulated machine supported, so it was hit-or-miss as to whether these worked out of the box. All the DSK's I downloaded worked without an issue, though, so if something comes in multiple formats, always pick the DSK. If it does come in DMK only, all is not lost. It may very well work, so go ahead and try it. But if it doesn't. the DMK will probably work in TRSTools, so you can copy the files to a temporary directory, then open a blank DSK and copy the files to that. The DMK may be a larger size than the DSK, so you may have to pick which files you don't need or copy them to multiple DSK images. I had to do this with the Hard Disk Drivers disk, which was larger than a DSK. I put the executables on one DSK and the docs on another. (I'll talk about setting up the hard drive in my next blog post, but at this point, just make sure to grab that disk image.)
Incidentally, I mention using a blank DSK above, but I didn't originally have a blank DSK image. SDLTRS Floppy Management tools does allow you to create a blank floppy, but I couldn't get these to load once I'd created them, so after a few failed attempts, I gave up with that. Now TRSTools does say it supports the Montezuma Micro disk format, which it does seem to, but I couldn't see how to create a usable disk image with it. To get around that, I just made a copy of one of my working DSK image files, opened it in TRSTools, removed all the files, and made sure it was not flagged as write protected. Then I just renamed it blank.dsk and would just make a copy of this every time I needed a blank floppy.
Now I mentioned above that some software will come as files instead of on DSK or DMK images. On the download page above I referenced, Zork I could only be downloaded this way, and the first copy of Turbo Pascal 3 I found on another page came as a zip of files. There are two ways to deal with this. The first is to use the cpmutils, which is a set of utilities written for xtrs, the base of the SDLTRS emulator, while other way is to use a blank disk image and add them using TRSTools.
In the SDLTRS distribution is a subdirectory called diskimages, with a disk image called cpmutils.dsk. Now, annoyingly, this disk image didn't load for me in MM CP/M, but I used TRSTools to copy the files to a usable blank disk image (you can download the result of this here, if you don't want to do this yourself). This has a bunch of files on it, but the three COM files are EXPORT, IMPORT, and XTRS. These are special CP/M programs that take advantage of hooks in the emulator to be able to transfer files to and from the local filesystem. So, for example, to make a disk image for Zork I, all you'd have to do is download the ZORK1.COM file, copy a blank disk image, and then type IMPORT ZORK1.COM ZORK1.COM. This works in that you don't get any errors, and something is copied, but when I tried to execute ZORK1, it gave me weird, inconsistent results. (This was after also copying ZORK1.DAT, which you need as well). When I then used TRSTools to copy the files to a disk image, this worked, so I have to conclude there's some issue with the IMPORT. If anyone has any clue, please leave a comment. I should mention, btw, that I did use EXPORT several times successfully, though I wasn't copying any COM files, only text files.
It's too bad that I couldn't get the IMPORT working though. TRSTools is nice, but as I'm a Mac user, it's a tad of a pain to use. I use VMWare Fusion to run Windows on my Mac, but I don't usually have that running, and having to switch to the Windows desktop (I don't run the unified desktop because that annoys me too) when I want to use TRSTools bugs me. But I keep disk images I'm working on in my shared folder between the Mac and Windows VM and that makes it easier.
Building a 4-Drive System
So now that you have a working CP/M system booting off floppy, and a way to transfer files, the last thing I'll mention is about changing your emulated system to a 4-drive system instead of the default 2-drive. Now as I mentioned in my last blog, I am not very familiar with CP/M, and certainly not familiar with Montezuma CP/M. So there may be a better way of trying to accomplish what I did. If so, please let me know in the comments. But this is what I had to do to get things to work so I could load up disks in four virtual drives.
BTW, if you haven't done so yet, make a copy of the CP/M boot disk image you're going to use. Also make sure you're working image is not write protected. This is set in the image file itself, not by the base operating system. You'll know if it loads in SDLTRS and when you look at the floppy management screen and it has an asterisk beside it. I didn't see any way to uncheck this in the Windows version, though in the Mac version you can unlock it. For Windows, you can use TRSTools and just go into Disk Properties under the File menu.
Boot up CP/M and run CONFIG and you'll see the following menu:

Select F for Disk drive definitions and you'll see:

Select 'C' and enter 4 when it asks, "How many drives?" That should bring you back to the same screen, but showing 4 physical drives instead of 2. His the ESC key (in SDLTRS, ESC is mapped to the BREAK key and Shift-up arrow is mapped to TRS-80's ESC), and you'll be back at the main menu shown above.
Go ahead and hit 'G' at this point, which will take you to the Disk format definitions menu:
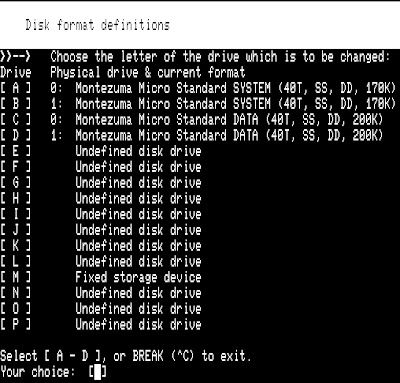


Now you'll notice that you do have four drives defined, A - D, but A and C seem mapped to the same drive, device 0, and B and D to the same device 1. Now someone who knows more about CP/M may understand this and how to work with this, but for me it just meant I couldn't get and disk images to read correctly in C and D. So if you're following what I did, select 'C' and you'll see:

The first two options match our new 4-drive disk definitions, but the two DATA format drives don't seem to work, so I set the C and D drives to 'A' to match the two drives that do work.
Once you've done all that, use ESC to get back to the main menu, and then SAVE THE CONFIG! It the 'H' option on the main menu. It's easy to just jump all the way back and forget this; I did it several times.
At that point, hit F10 to reboot and you have a 4-floppy drive system.
In my next post, I'll go through setting up a hard drive for my emulated system.
I'd love to hear about setting up hard disks with Montezuma CPM on TRS80. I'm getting in to that because I want direct live printing from CPM and Matthew Reed's emulator is the only one that seems to fit the bill, and hard disk is nice for the capacity. Peter Schorn's Altairz80 on SIMH and Andreas Gerlach's Yaze-AG will print to a file but cant handle LPT1 on Windows or LPR on OSX/Linux for direct printing.
ReplyDeleteHope you're well and able to keep blogging - very interesting nostalgia blogs for computing addicts like me.
ReplyDelete